
How to fix a leaky roof
Fix roof leaks yourself with no prior experience
While most homeowners pay little attention to their roof’s care and maintenance, it is an essential structural element of any home. Exposed to significant wear and tear from the elements, a sound roof protects the entire house’s structural integrity, saves energy, maintains curb appeal, and adds value.
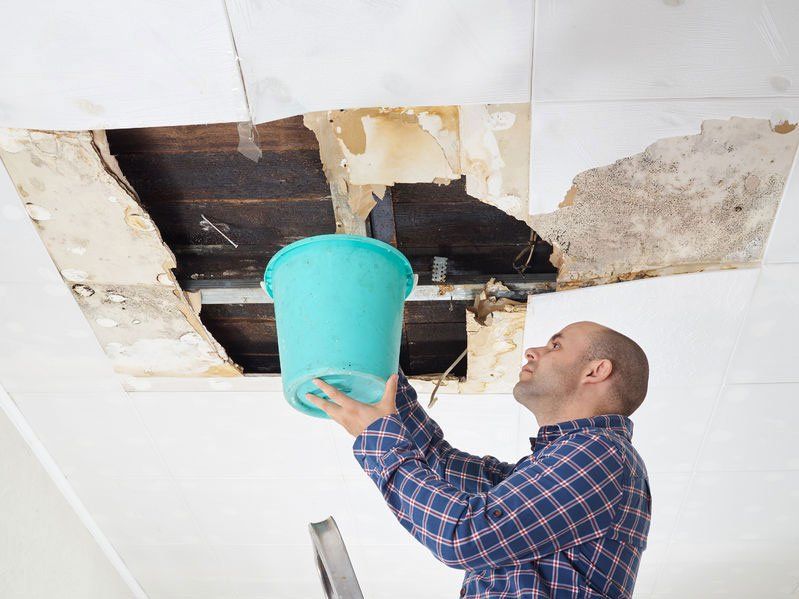
A leaky roof becomes a substantial inconvenience if not repaired quickly and can cause damage to the attic, ceiling, and walls. Water intrusion also promotes the growth of mold and mildew that can create health and safety problems for your family.
Repairing a leaky roof begins by determining the cause of the leak and finding its location. Once found, you can repair many of these leaks using one of the many simple techniques we describe below.
Causes of a leaky roof
Numerous issues can cause roof leaks, but here are some of the most common.
Missing or broken tiles or shingles
Heavy rains and high winds can damage or loosen your roof tiles. Each tile or shingle is essential to keeping a roof watertight. Missing tiles create a hole that permits water to seep through.
If you find a roof shingle or tile on your driveway or lawn, it is a good indication your roof is damaged. A simple visual inspection of the entire roof will also expose any missing tiles.
Flashing damage
Flashing is made with thin metal sheeting installed to seal roof transitions that are vulnerable to leaks. The base of a chimney and sections where the roof joins a wall are common areas. When flashing is damaged, slips out of place, or the caulking dries out and cracks, water will often get through the gaps.
Blocked gutters
Clogged gutters are an often-overlooked leak-causing problem mainly because their contents are out of sight. When they fill up with leaves, branches, and other debris, small dams form that slow down or stop rainwater flow. The water can fill your gutters to the brim and cause leaks.
The extra weight from the pooled water can bend the gutters or tear them away from the wooden fascia boards that support the gutters, allowing moisture to enter your home.
Chimney damage
Although many chimney stacks are built with bricks and are highly resistant to harsh weather, damage can appear with time. Water can seep in through tiny cracks or holes that develop in the mortar that holds the bricks together. Rainwater may also collect at the base of the chimney and eventually trickle through the roof.
Skylights
Although skylights allow natural light to enter your home and provide some welcomed ventilation, they can be the source of water dripping on your living room floor.
Leaks are most commonly the result of an incorrect installation or the use of substandard materials. If the protective flashing around the skylight becomes damaged due to corrosion, rainwater can enter and create a leaky nightmare.
Fascia or soffit damage
Water can soften wood fascia and soffits (the underside component of roof eaves) over time resulting in small holes and leaks. The damage may be further exaggerated by small animals such as squirrels and birds.
Roof vent damage
Roof vents provide ventilation in your attic, preventing high temperatures that create cracks and damage shingles. Common vents include ridge vents, box vents, hard-wired powered attic vents, roof turbines, cupola vents, and solar powered attic vents.
Vent water leaks can occur when plastic roof vents develop cracks over time. A damaged vent pipe boot or flashing will also allow water to enter the house.
Age of the roof
While roofing materials are selected for long life, severe weather and exposure to sunlight will deteriorate your roof over time. When older materials weaken, the roof’s durability is affected, and water leaks are more likely to occur. Repairs can be made to the most affected areas to extend a roof’s life. However, a typical roof lasts about 20twenty years, so a new roof will be required eventually.
How to find roof leaks
Most things in life follow the path of least resistance, and water is no exception. Once water penetrates the roof, it can flow along the decking or sheathing, rafters, and even on the attic side of ceilings until it finds a place to drip into the house.
Locating the leak’s source can be problematic since the signs of a leak are often some distance from the original entry point.
To find the leak's source, take a powerful flashlight to the attic during the daylight hours. Step only on the large support beams and never on the insulation or the top side of the ceiling. Neither one can support your weight.
Begin searching directly above the place where the leak came through the ceiling, working your way upward, looking for wetness, water stains, mold, or discolorations made by moisture on the wood framing members.
When you find any of these telltale marks, first look for any roof penetrations located directly above. These include chimneys, dormers, vents, plumbing, and other objects that project through the roof.
Next, switch off the flashlight and look for daylight shining through any cracks or holes. Once you have found the leak’s source, look for more moisture stains and other signs of water damage.
Water-test method for roof leaks
If you cannot find your leak with an outdoor visual roof inspection or using the flashlight-in-the-attic method, you can try spraying the roof with water on a dry day.
Ask someone to help with the test. One person goes onto the roof with a garden hose fitted with a nozzle hand sprayer, while the other remains in the attic with a strong light and bucket for any water that enters.
The person on the roof sprays the tiles or shingles, starting at the lowest point near the eaves, and slowly squirts higher on the roof until water from the leak appears in the attic. Once the hole is found, mark the location by pushing a nail up through the roof, making it visible to the person standing above.
How to fix a roof leak after the source is found
Once you have found the source and location of your leaky roof, in most cases, fixing it is a straightforward task.
Repairing roof flashing
Damaged or defective metal roof flashing is the most common source of roof leaks. It is used around vent pipes, dormers, and chimneys, and it protects roof junctions, edges, and valleys.
You will need the following materials and tools for flashing repairs: Roofing adhesive or cement, caulking gun, masonry caulk, urethane roofing cement or silicone caulking compound, claw hammer, roofing nails, ladder, and a crowbar.
Vent pipe flashing
To replace vent pipe flashing, remove the shingles that cover the existing flange. Slip a crowbar under the vent flashing edge and pop up the nails.
Remove the old flashing by lifting it over the vent pipe. Clean off old caulk and debris from the base of the vent and the surrounding roof area. Slip the new flashing over the vent pipe and position it under the shingles.
Remove the old flashing and scrape any old caulk and debris off the roof. Slide the new flashing over the vent pipe and secure it with roofing nails where the shingles will cover it. Replace the old shingles (if they are still in good condition) and cover the nail heads with roofing cement.
Resealing existing flashing on chimneys and roof junctions
Chimneys are made watertight with two layers of flashing. Step flashing consists of L-shaped sheet metal pieces woven into the shingle layer and extended up the side of the chimney.
The counterflashing is a second layer of metal inserted in the chimney mortar joints and bent down to cover the top of the step flashing.
If the metal flashing is in good condition, you can close leaks by simply resealing. Dig out the old caulking and mortar between the flashing and the chimney. Use special masonry caulk along the edges of the flashing to reseal the joints.
Reseal the joint between the step and cap flashing with a silicone caulking compound or urethane roofing cement.
Shingle and tile repairs
Typical materials used for residential roofing in the U.S. are asphalt, wood, slate, ceramic tile, and metal. Wood shingles or shakes are usually made from redwood or cedar, while asphalt shingles are made with fiberglass or other organic materials.
Asphalt shingles are the most common because they are the least expensive, effective in all environmental conditions, and easy to install.
Shingle roof repairs
Repairing an asphalt or wood shingle roof requires just a few materials and tools: Roofing adhesive, caulking gun, claw hammer, roofing nails, crowbar, ladder, and of course, new shingles.
- With your hands, lift the damaged shingle.
- Using the hammer, remove the old roof nails.
- Gently lift the shingle above the damaged area with your crowbar.
- Cut the replacement shingle to the correct length, and then slide it into place.
- Secure the new shingle with your hammer and the roofing nails.
- Apply roofing sealant to the nail heads.
On older asphalt shingles with curling corners, use a caulking gun to apply a dab of roofing sealant under each corner. Weigh it down with a brick at least 24 hours until the adhesive dries.
Tile roof repairs
The materials and tools needed to repair a tile roof include a hammer, crowbar or pry bar, tile clip or roofing nails, clear roofing sealant, ladder, and replacement tiles.
If the damaged tile is only cracked, you can lift the tile carefully and apply roofing sealant to the area underneath the tile. Replace the cracked tile to its original position and press down firmly. Apply sealant along the crack on the top of the tile to seal it.
Lift tiles that are damaged beyond repair using the crowbar. For a stubborn tile, you can carefully break it into pieces with the hammer and remove it. Secure the replacement tile in position, applying sealant and using a roofing nail or tile clip if required.
Roof repair safety
The Occupational Safety and Health Administration (OSHA) requires roofers to use a Personal fall Arrest System (PFSA) for safety. We recommend that you employ a safety system, even a rope tied around the chimney, while making repairs to your leaky roof.
Jeff Harper is a writer for BestReviews. BestReviews is a product review company with a singular mission: to help simplify your purchasing decisions and save you time and money.
BestReviews spends thousands of hours researching, analyzing and testing products to recommend the best picks for most consumers. BestReviews and its newspaper partners may earn a commission if you purchase a product through one of our links.
Distributed by Tribune Content Agency, LLC.

Want more information?

(407) 901-9878
Covering Florida
Latest news